Happy Lunar
New Year!
We hope this kit brings your family together to cook and pursue deeper connections to begin the new year.
This is your guide for how to use your meal kit!


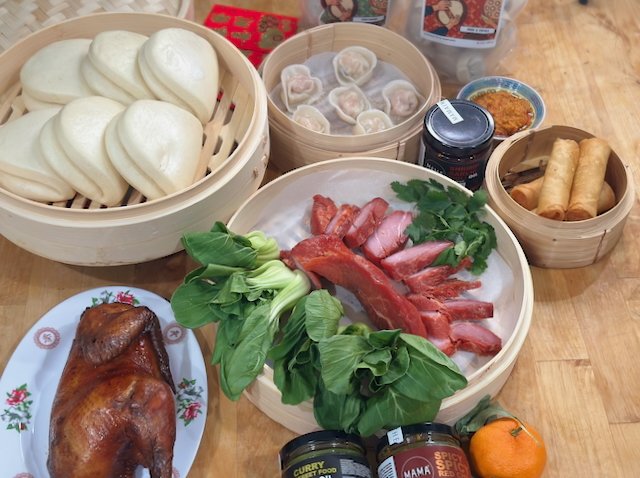
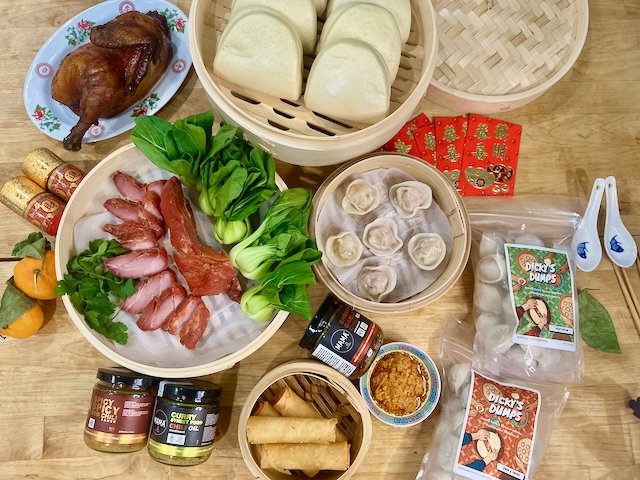
Chinese New Year Feast Kit
We hope this meal kit brings your family closer together as you cook, connect, and create lasting memories to kick off the new year.
Whether it’s a simple dish or a more complex recipe, the real magic happens when you work together.
It’s the shared sense of accomplishment, and the small victories along the way, that deepen your connections and foster meaningful moments.
Each step, each bite, and each realization—big or small—leaves a lasting impression in its’ own unique way.
Now, let’s eat!
Kit Instructions
-
Char siu pork is one of chef Cheryl’s favourite dishes to include in her family’s CNY feast.
Simply place the pork with all its sauce into a shallow bowl or any vessel that can fit inside your steamer.
Find a pan or pot that can hold the steamer baskets at a height that allows for 3-4 cups of water to be boiled underneath.
Bring the water to a boil without the basket on top. Cover the steamer basket with lid and place over boiling water for approximately 8-10 minutes until they are fully heated through.
Make sure you keep all the sauce that accompanies the pork, its a great source of flavour to add to the bao buns with your pork or simply to enjoy with the Longevity noodles!
Secret: we find ourselves enjoying it with everything.
-
The symbolism of eating meat is typically unity and wholesomeness. Traditionally, a meat or fish dish would be eaten in as whole a manner as possible.
To heat up this dish, there can be 2 simple methods - oven or stove top.
Oven: preheat your oven to 420 degrees on. convection bake. Lay out the pork with the crispy side up if possible. If not, lay each piece on its side with a space between each piece. This space will allow hot air in your oven to circulate and make the sides crispy!
Once preheated, place your tray of pork on the middle rack for 10-12 mins and move to the upper rack for 5 mins to really wake up the crispiness!
Stove top: find your favourite non stick pan and preheat in over medium heat. Once your pan is hot, place each piece of pork either side or its crispy edge down. Cover the pan, this allows dry heat to help crisp the pork.
Tip: any left over bits would be great for a fried rice or pasta dish
-
Simply place the cut up chicken with into a shallow bowl or any vessel that can fit inside your steamer. Pour accompanied sauce over it
Find a pan or pot that can hold the steamer baskets at a height that allows for 3-4 cups of water to be boiled underneath.
Bring the water to a boil without the basket on top. Cover the steamer basket with lid and place over boiling water for approximately 8-10 minutes until they are fully heated through.
This chicken is intended to be served bone on. If you prefer to enjoy boneless, simply take it off the bone while it is cold.
-
Slice the pork in approx 1cm thick COLD- its easier to handle than when it is hot!
Simply place the pork with all its sauce into a shallow bowl or any vessel that can fit inside your steamer.
Find a pan or pot that can hold the steamer baskets at a height that allows for 3-4 cups of water to be boiled underneath.
Bring the water to a boil without the basket on top. Cover the steamer basket with lid and place over boiling water for approximately 8-10 minutes until they are fully heated through.
Make sure you keep all the sauce that accompanies the pork, its a great source of flavour to add to the bao buns with your pork or simply to enjoy with the Longevity noodles!
-
You will find here, tofu, lotus root, daikon and eggplant!
Simply place the all the veggies with all its sauce into a shallow bowl or any vessel that can fit inside your steamer.
Find a pan or pot that can hold the steamer baskets at a height that allows for 3-4 cups of water to be boiled underneath.
Bring the water to a boil without the basket on top. Cover the steamer basket with lid and place over boiling water for approximately 8-10 minutes until they are fully heated through.
Make sure you keep all the sauce that accompanies the veggies, its a great source of flavour to add to the bao buns with your pork or simply to enjoy with the Longevity noodles!
-
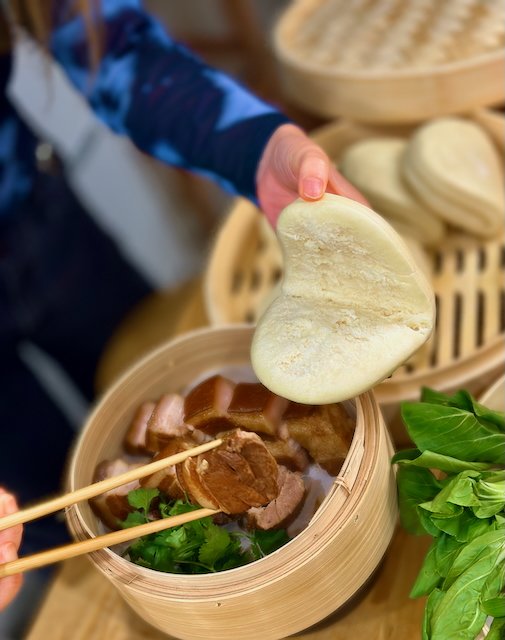
These fluffy buns are one of our chef’s childhood favourites and are a staple dish in her family’s Chinese New Year feast.
Find a pan or pot that can hold the steamer baskets at a height that allows for 3-4 cups of water to be boiled underneath.
Bring the water to a boil without the basket on top. Prep the baskets by lining the parchment paper inside the basket and place the buns on top. Cover the steamer basket with lid and place over boiling water for approximately 5 minutes until they are fully heated through. Allow them to cool slightly before handling.
To enjoy:
Typically, a layer of the peanut sugar is spread on the side of the bun that has a gentle concave because it’s the perfect nest to hold all the fillings! Follow with a layer of your favour meat / vegan protein topped with pickled carrots and any of the condiments provided, including the sauce of the meat (if available).
These are especially fun for wee ones as they get to build their own bun and witness a “burger” in another shape!
Please share with us your journey along the way and tag @nourish.kitchen.canada
-
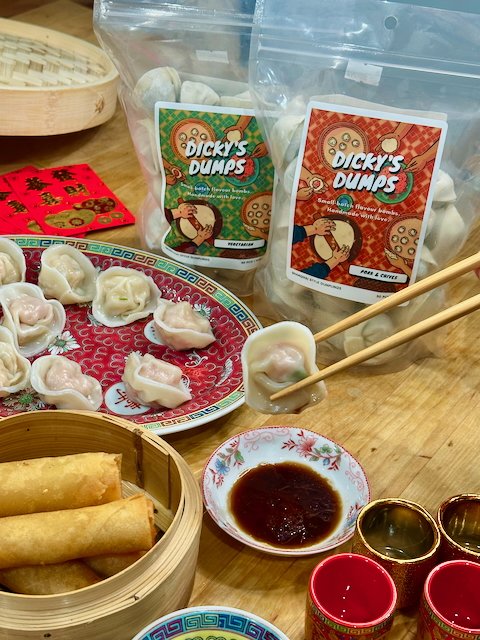
The symbolism for dumplings is fortune. The“old money” in traditional chinese history are silver or gold bricks such as these.
Find a pan or pot that can hold the steamer baskets at a height that allows for 3 cups of water to be boiled underneath.
Bring the water to a boil without the basket on top. Prep the baskets by lining them with parchment paper inside and place the dumplings on the parchament paper. Cover the steamer basket with lid and place over boiling water for approximately 5-8 minutes until they are fully heated through.
These dumpling are a collaboration with Dicky’s Dumps, they are packed with flavour on its own but it never hurts to complement with a dip into the dumpling sauce provided.
-
The symbolism for noodles is that of a long life or long andcontinuous sequence of good fortune
To heat up this dish, we will simply stir fry everything in a matter of minutes.
Find your favourite non stick pan, preheat over medium heat. Once your pan is warm and toasty, add in some oil and following the principles of cooking the ingredients that require the most time first.
Start by sautéing the mushrooms and thickest vegetables, this doesn’t have to be only one kind, you can mix different kinds. Gently season with salt. Allow the veggies to sit idly in the pan, resist your urge to stir constantly. Give the vegetables time to get tender and lightly golden brown before adding the next group of vegetables. At any point if you notice too much browning, simply add a little bit of the mushroom water.
Once your veggies are sautéed, simply set them aside and sauté the noodles. Using the same pan, add a little bit of oil and toss in the noodles. Allow the noodles to sit idly in the pan, resist your urge to stir constantly. Give them a toss once you notice some browning. Add in half of the sauce and cook until there’s even browning throughout or to your liking!Now combine with the sautéed veggies and add in the rest of the sauce if you desire. Enjoy with green onions and cilantro.
There’s no need to follow these instructions so closely because after all, this is about working together and having fun! Everything will still taste delicious whether you meticulously sautee each type of vegetables or not.
Especially when working with wee ones, let them take the lead, stir as much as they want. Try to toss the noodles! Make a mess, it’s just a little mess and they will help clean up!
The harmonious chaos of this process is a part of the connections you will build.
-
Spring rolls (chun juan) take their name from the holiday for which they're traditionally prepared: the Spring Festival aka as Chinese New Year. They symbolize bars of gold and bring wealth and prosperity in the year to come.
These are great to do in pairs. One who have more patience can head up the task of separating the wraps. They are thin “crepes” We have included 2-3 extras just in case some break in the process. The filling amount is designed to make 6 rolls (not burrito sized) for 2 folks.
Another can add water to the flour to make a slurry to be the “glue” for sealing the rolls.
There are 2 ways we like to share with you to enjoy them. First is fried/ baked and second is steamed which is a version that chef Cheryl is accustomed to from her childhood.
The main difference that affects the process is whether or not we make these rolls ahead or at the table!
Perhaps read on first before you decide.
Fried/ baked:
Place the spring roll wrapper on a flat surface so one of the four corners is facing toward you (it should look like a diamond).
Use about 3 tablespoons of pre-cooked, cooled/refrigerated filling per spring roll, and place the filling 2 inches from the corner closest to you.
And gently press down on each side of the filling to flatten the spring roll wrapper.
Stir up the flour slurry with your finger, and gently brush with your finger tips onto the opposite corner of the wrapper (you can also do it on the diagonals, like an envelope seal).
Continue rolling the spring roll into a tight cigar.
Place it sealed side down on a wooden cutting board or a sheet pan lined with parchment paper.
And if it doesn’t roll up, making them into rectangle pouches would be perfect too! Its adapted symbolism would be money pouches and wallets.
Let’s keep it fun and go with the flow.
Too cook these, you can bake them in a preheated 400 degree oven until golden. Or simply air-fry and shallow fry.
Steamed & build it at the table:
Heat up the spring roll filling by a quick sautee until it’s fully heated through or a quick steam or even a gentle heat in the microwave. Whatever creates ease in your kitchen.
Once the table is ready and everyone is seated. Simply heat up the wrappers in the steam basket for 3-4 mins or 1 min in the microwave covered by a damp cloth.
Once at the table, following the same techniques as rolling up the fried version you approach here the same way.
A fun flavour to add to these “steamed” spring rolls is to add a sprinkle of the peanut sugar. This is a traditional method for chef Cheryl’s family.
Hope you try both ways and may there be laughter and fun shapes created!
Please share with us your journey along the way and tag @nourish.kitchen.canada
-
SymbolismProsperity :: Growth :: Family Unity :: Good Fortune :: LoyaltyPatience and Persistence :: Positive Thinking
The name "nian gao" is similar to the phrase "higher year" and is a wish forincreased prosperity in the coming year. The word "gao" means "high" or "tall"and symbolizes growing taller.
Each bite is considered a bite of good fortune. The long durability (shelf life) of nian gao symbolizes loyalty. The long time it takes to make it symbolizes patience, persistence, and determination. The process of making nian gao requires a clean mind and heart, which symbolizes thinking positively.
Find your favourite non stick pan and preheat over medium heat. Cut up the nian gao into your favourite shapes. Once the pan is warm, add in the smallest amount of oil, and place the nian gao in the pan. We are only looking to crisp up the sides of the nian gao. We find it more enjoyable if all sides are seared but that can be different for you!
Once all sides are seared or the centre of the nian go is soft, it is ready to enjoy! If you have a preference for sweeter flavour, enjoy by dipping in some sesame sugar or maple syrup.
Whipped cream would be great as anon-traditional option if you have it on hand.
Pro Tip- it is always recommended to compliment nian gao with a hot beverage. The heat will help with digestion.
Please share with us your journey along the way and tag @nourish.kitchen.canada
-
Bring about 2 cups of water to a boil and add in the provided brown sugar. Add in the tang yuan while the water is at a boil. Once the tang yuan are added, it is important to gently move the water so they dont stick to the bottom of the pot- while being mindful that you are not breaking the tang yuans themselves. Once they float to the top, they are ready to enjoy!

Fun craft and activity ideas
Supplies not included in the kit
Help celebrate the Year of the Snake in 2025 with simple and fun Chinese calligraphy activities. Here's how to get started!
Materials Needed:
Black ink or black watercolor paint (any paint can work)
Paintbrush (soft and pointed is ideal)
Red paper (symbolizing good luck) or plain white paper
A small dish for the ink/paint
Water and a rag for cleaning brushes
A reference sheet with Chinese characters (see below)

Instructions:
1. Choose Festive Characters
Start with these basic Chinese characters to represent the New Year theme:
福 (Fú): Good fortune
春 (Chūn): Spring
年 (Nián): Year
蛇 (Shé): Snake (representing the zodiac animal)
喜 (Xǐ ǐ ): HappinessHelp
2. Set Up the Workspace
Cover the table with newspaper or a cloth to protect it.
Prepare a small dish with black ink or diluted black paint.
Provide each person with a piece of red or white paper and a paintbrush.
3. Practice Basic Strokes
Horizontal stroke (横, Héng): A straight line from left to right.
Vertical stroke (竖, Shù): A straight line downward.
Dot (点, Diǎn): A small, pointed mark.
Downward stroke to the left (撇, Piě): A curved line to the left.
Downward stroke to the right (捺, Nà): A curved line to the right.
4. Write the Characters
Demonstrate writing one character at a time.
Let kids follow along, taking their time with each stroke.
Focus on balance and proportion, but also encourage creativity
5. Add Decorative Elements
After completing the characters, allow kids to embellish their work:
Draw small snakes alongside the characters to represent this year’s zodiac animal.
Add festive designs like lanterns, firecrackers, or gold glitter.
Use stickers or stamps with traditional Chinese patterns.
6. Display the Art
Showcase the finished calligraphy by hanging it on walls or windows.
Red paper and beautiful characters will add a festive atmosphere and bring good luck!
Tips for Success:
Emphasize Fun: Keep the activity lighthearted, especially for young kids.
Practice Patience: Remind kids to take their time with each stroke.
Celebrate Creativity: Highlight unique and colourful designs they add.
This activity is a wonderful way for families and children to connect with Chinese traditions and celebrate the Year of the Snake in 2025. 🐍✨
Here’s a simple step-by-step guide to making a paper lantern to celebrate Lunar New Year 2025.
Materials Needed:
Colored paper (preferably red and gold for Lunar New Year)
Scissors
Glue stick or tape
Ruler
Pencil
String or ribbon (optional, for hanging)
LED tealight candle (optional, for illumination)

Instructions:
1. Prepare the base
Cut a 1 - 2 cm strip of paper from the short edge of your coloured paper (letter size works well). This will be used later for a handle.
Fold the paper in half lengthwise. Ensure the edges align neatly.
2. Mark the Cutting Lines
Using a ruler and pencil, draw lines parallel to the folded edge, spaced about 1 cm (or 0.5inches) apart.
Leave about 2–3 cm (1 inch) of uncut space along the open edges (top and bottom).
3. Make the Cuts
Carefully cut along the pencil lines from the folded edge up to the uncut margin. Do not cut all the way through!
4. Form the Lantern Shape
Unfold the paper to reveal your evenly spaced slits.
Roll the paper into a tube shape, bringing the shorter edges together. The slits will bow outward, creating the lantern’s structure.
Use glue or tape to secure the edges together.
5. Add the Handle
Take the strip of paper you cut at the beginning or use a strip of paper of a contrasting color.
Attach the strip to the top of the lantern with glue or tape to form a handle.

6. Optional Embellishments
Decorations: Add stickers, gold foil, or Chinese characters (like 福 for "luck").
Illumination: Place an LED tealight inside for a safe glow.
Hanging: Attach a string or ribbon to the handle for hanging.
Tips for Customization
Use patterned or textured paper for a more festive look.
Layer multiple lanterns of different sizes for a striking display.
Incorporate tassels or beads to enhance the traditional feel.
Now you’re ready to celebrate Lunar New Year 2025
with a touch of handmade charm! 🎉🏮